Bunny CDN
Bunny CDN is a content delivery network that works well with Storj, providing a caching layer beyond Storj's already reliable global performance. Storj is great for distributing files around the world, but for some workloads a Content Delivery Network combined with Storj is the more appropriate choice. CDNs leverage distributed caching to reduce latency and enhance website performance from servers located closer to the end-users.
The following directions show how to set up static website hosting with Storj and Bunny CDN.
Create a publicly shared bucket / prefix in Storj
To work with Bunny CDN, you'll first need to share a bucket or prefix (folder) in Storj.
This can be done by following Part 1 of our Static site hosting directions, or using the Storj.io's Object Browser.
If using our CLI tool, record the storj-root and storj-access values from the Static site hosting directions.
If using the Storj.io website, you'll need to determine the storj-root and storj-access values from the Shared Link. Visit the Shared Link in a browser, and copy the new, resulting URL. This URL will follow a known formula: https://link.storjshare.io/s/ + storj-access + / + storj-root.
In the example of https://link.storjshare.io/s/jwm2j2juznpzcyl5kzgxzxvareoq/mybucket/myfolder/, record storj-root:jwm2j2juznpzcyl5kzgxzxvareoq and storj-access:/mybucket/myfolder/
The storj-root part of a Shared Link URL is "URL-encoded." URL-encoded values often have slash characters ('/') replaced with %2F. Visiting the URL in a browser is a convenient fix in most circumstances.
Configure Bunny CDN
Log into Bunny.
Click
CDNof the left hand menu.Click
Add Pull Zonein the upper right.Enter any name in the Pull Zone Name section. Record the full domain name (EG:
example.b-cdn.net) for later use.Set
Origin URLtohttp://link.storjshare.io/Set
Host Headerto the URL to the desired final hostname (EG:www.example.test).Chose your tier and pricing zones.
Click
Add Pull Zone
Configure Your Domain Registrar
- In your DNS provider, create a CNAME record on your hostname corresponding to your Bunny domain created above (EG:
example.b-cdn.net).
Ensure you include the trailing . at the end of your CNAME if your DNS providers allows.
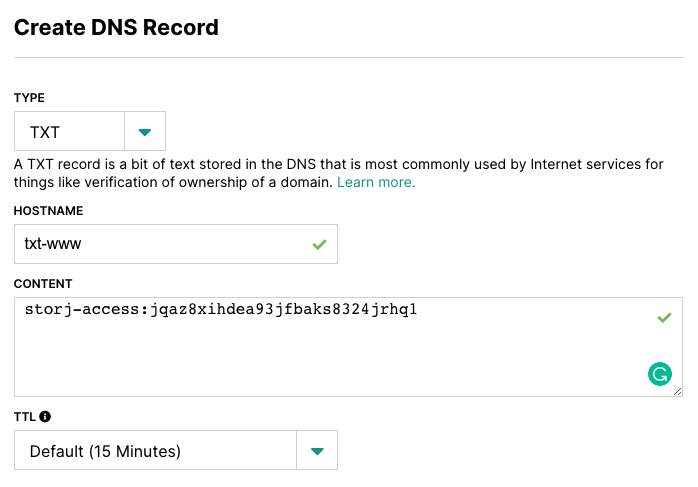
- Create two TXT records, prepending
txt-to your hostname. Set them equal to yourstorj-rootandstorj-accessvalues.
Root Path: the bucket or object prefix key that you want your root domain to resolve to (and that contains your index.html file).
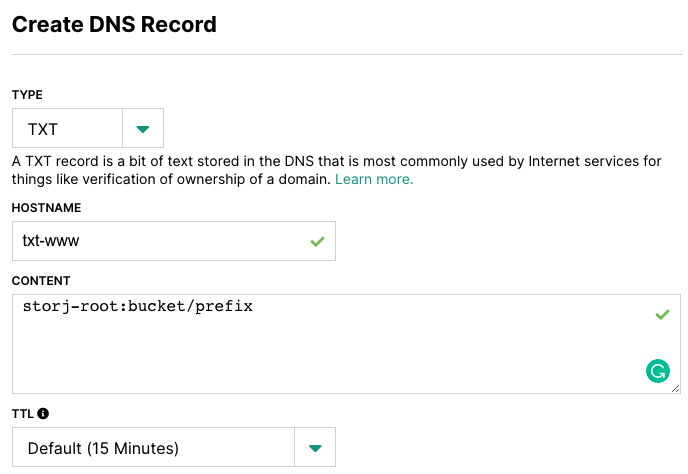
Access Key: the readonly and public access key to your root path.
You can check to make sure your DNS records are ready with
dig @1.1.1.1 txt-<hostname>.<domain> TXTOptionally, if you create a page titled
404.htmlin the root of your shared prefix, it will be served in 404 conditions.That's it! You should be all set to access your website! e.g.
http://www.example.test
For more detailed information, refer to Bunny's documentation for integrating Bunny CDN with Cloudflare