Atempo (Miria)
Atempo is a leading software vendor providing data management solutions to companies worldwide. Miria is an open solution from Atempo that provides high-performance backup, movement, synchronization, and archiving for large data sets from heterogeneous sources. It delivers vendor-agnostic solutions for petascale NAS and cloud environments and has five pillars:
- Analytics
- Migration
- Data backup
- Data archiving
- Synchronization
For more information, visit https://www.atempo.com/solutions/hybrid-nas-storage-synchronizations/#
Advantages of Miria with Storj
The combination of Miria and Storj provides complete flexibility for cloud management at a competitive cost. Miria handles data archiving and organization from primary storage to the Storj cloud S3 infrastructure; large data sets can be hosted, stored, replicated, and recovered at any time through Storj's platform.
Security integrations in Miria ensure that data on Storj is kept safe, while metadata archives allow large datasets to be easily accessible and manageable. Manual and automatic archiving capabilities in Miria simplify access and economize storage costs. Miria meets any requirements: data volumes, different file sizes and formats, storage technologies, and workflows.
Integration
Miria integrates with Storj cloud storage through the S3 protocol. The Miria server orchestrates the Miria data movers, which integrates with Storj through the S3 protocol. Conversely, any other storage platform also integrates with the data movers, thus integrating data movement and management from heterogeneous sources. The Miria solution is fully scalable - simply add another Miria Data mover as needed.
To integrate Miria with Storj, you must create S3 credentials for Miria in Storj and pass them to the Miria server through the Miria web interface.
Requirements
- An active Storj account, or you can sign up here https://storj.io/signup?partner=atempo
- A bucket for Miria in your Storj instance
- An instance of Miria 2021 or newer
- Access to the Miria Web UI
Request a demo of Miria or contact Atempo for pricing.
Set up Storj
Create an Account
To begin, you will need to create a Storj account.
Navigate to https://storj.io/signup?partner=atempo to sign up, or log in https://storj.io/login if you already have an account.
Create a Bucket
Once you have your Storj account you can create a bucket for your data to be stored in.
Navigate to Buckets on the left side menu.
Click New Bucket on the top right.
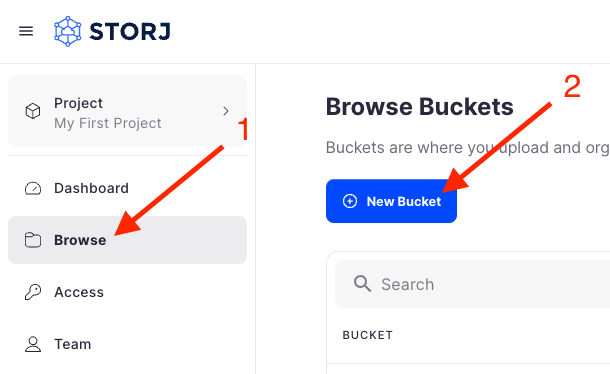
Assign the bucket an easily identifiable name, such as "my-bucket".

Click Create bucket
Generate S3 credentials
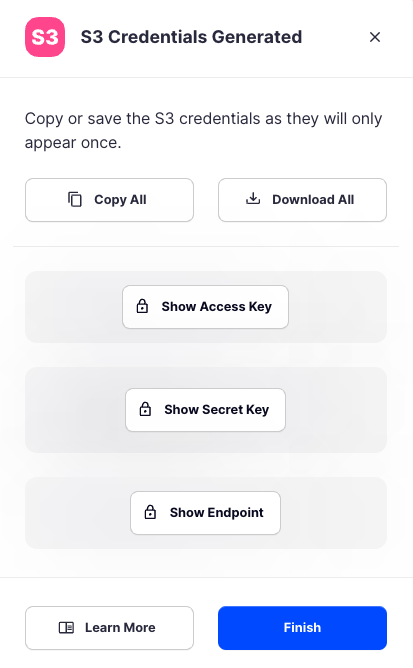
Storj has an Amazon S3 compatible API and you'll need generate S3 credentials to use it. S3 credentials consist of an access key, secret key, and endpoint.
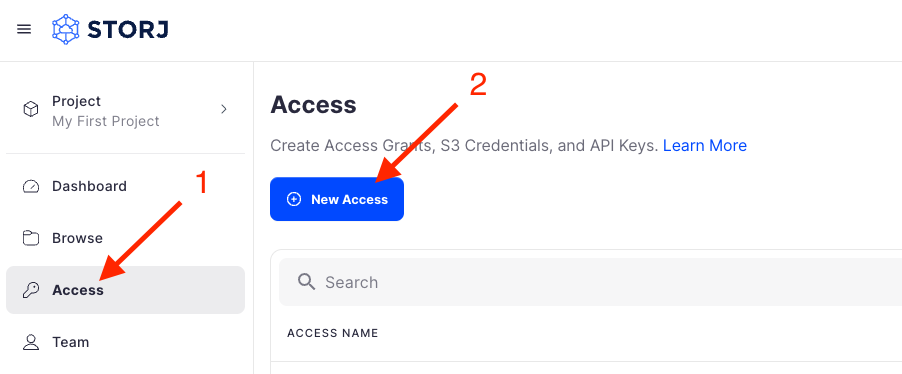
Create S3 credentials in the Storj console:
Navigate to Access on the left side menu.
Click Create S3 Credentials under the S3 Credentials block.
When the Create Access screen comes up, set specifications according to the following guidelines:
- Type: S3 Credentials
- Name: The name of the credentials (e.g. my-access)

Click Continue to provide permissions
- Permissions: All
- Buckets: Feel free to specify the bucket you created above (e.g. my-bucket), or leave as “All”
- End date: provide an expiration date for these credentials (optional)
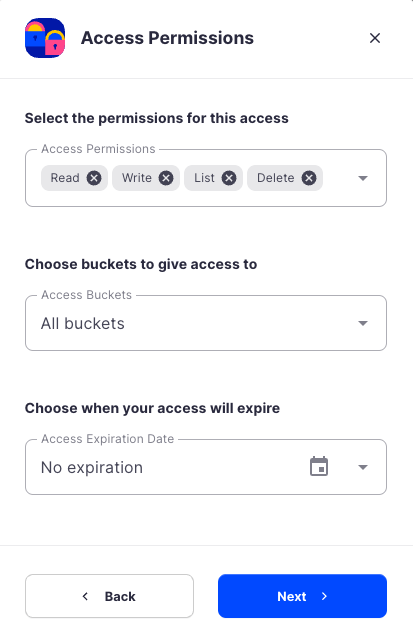
Click Continue to provide Access encryption Information
In order to see the data uploaded to your bucket in the Storj console, you must unlock the bucket with the same encryption passphrase as the credentials.
- Use the current passphrase: this is default option
- Advanced: you may provide a different encryption phrase either your own or generate a new one.
- Enter a new passphrase: use this option, if you would like to provide your own new encryption phrase
- Generate 12-word passphrase: use this option, if you would like to generate a new encryption phrase
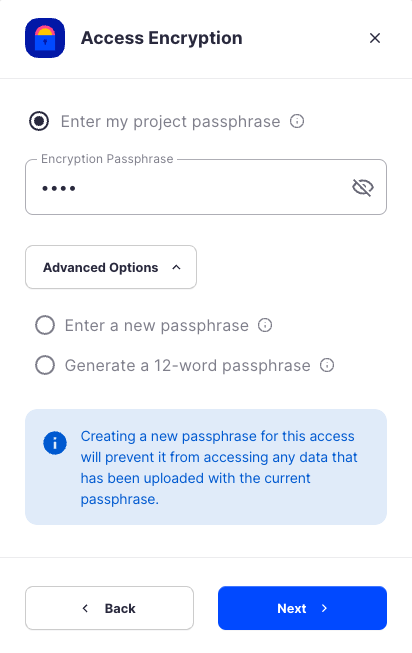
Click Create Access to finish creation of your S3 credentials
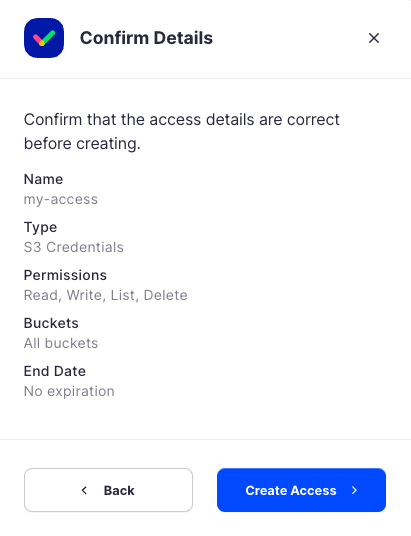
Click Confirm the Confirm details pop-up message
Your S3 credentials are created. Write them down and store them, or click the Download all button. You will need these credentials for the following steps.
Integrating Atempo (Miria) with Storj
Log into the Miria web UI.
Select Infrastructure in the left panel
Select Object Storages.
Select New Storage Manager.
Choose "Storj" or "General Storage" in the Storage Manager Type dropdown list.
Click Next.
Enter a name for your Storage Manager, such as Storj, and the appropriate Storj service URL into the Configuration part.
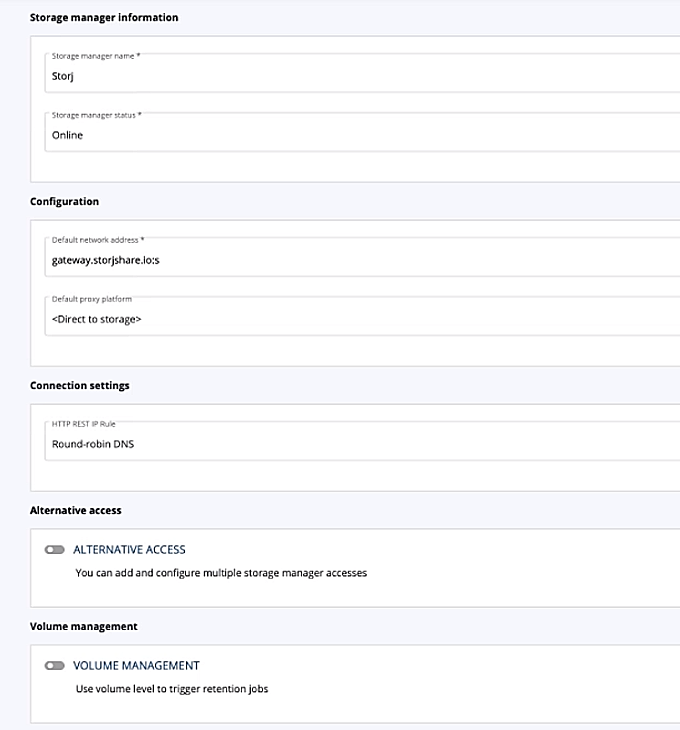
Click Create.
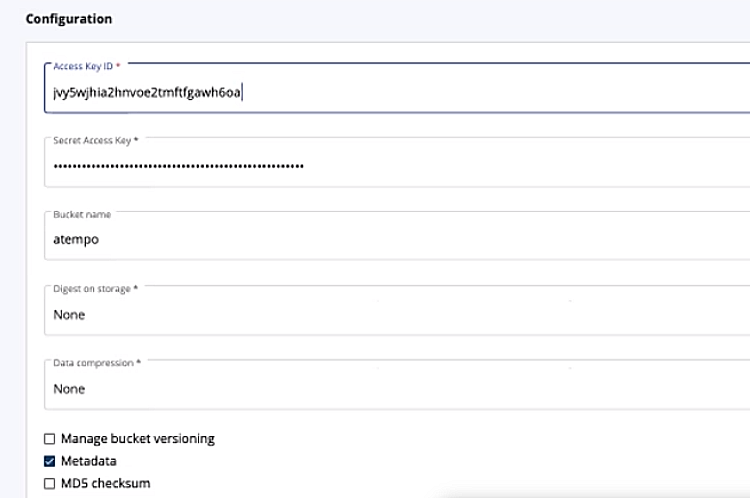
Enter the access key in the Access Key ID field and the secret key in the Secret Access Key field with the S3 credentials generated previously.
If desired, enable the Data compression checkbox to optimize the size of data stored in the Object Storage.
The new Storage Manager Container is ready for data storage.
You can store backups, archives, tiered data, or synchronized files from primary storage.
Create a new project.
Configure Start the task and check its progression.
Once the task is complete, you should see the files and folders on your Storj account inside my-bucket.