Iconik
Iconik is a cloud media management and collaboration software that gathers and organizes media from multiple storage locations. Iconik has powerful features that allow users to find, share, and collaborate on media from anywhere in the world. Iconik is web-based and runs in the cloud, using its Iconik Storage Gateway (ISG) to manage and track files while allowing users to bring their own storage.
Advantages of Iconik with Storj
Iconik is easy to use and intuitive with a clean and intuitive platform. It organizes your media by making it searchable.
Edit, manage, and collaborate on files in a feature-rich environment. Storj integration with Iconik allows multiple users from different locations to view and edit your files on Storj simultaneously. Even parties who do not use Iconik can be invited to collaborate on documents in Iconik. Iconik also provides fine control of data sharing, allowing you to remove shares and add a time limit on shares.
Aggregates files from multiple cloud storages. If Storj is only one part of your storage solution, Iconik makes it easy to aggregate your files from multiple storage providers.
Cost Savings. Adds editing and sharing features to your Storj data, creating feature-rich storage and while maintaining low costs for the storage itself.
Integration
To integrate Storj storage with Iconik, you will mount your cloud storage in Iconik's Admin section using S3 credentials.
Iconik integrates with any S3-compatible cloud storage platform.
To complete the integration, you will need:
A Storj account - sign up here https://storj.io/signup?partner=iconik or go to https://storj.io/login if you already have an account.
An Iconik account.
Iconik is compatible with Windows, Mac, and Linux OS. To request a trial, visit https://www.iconik.io/trial.
Create a Storj Account
To begin, you will need to create a Storj account. If you already an account, go to https://storj.io/login.
Navigate to https://storj.io/signup?partner=iconik to sign up. Enter your full name, email address, and a password, as shown below:

Create a Bucket
Once you have your Storj account you can create a bucket for your data to be stored in.
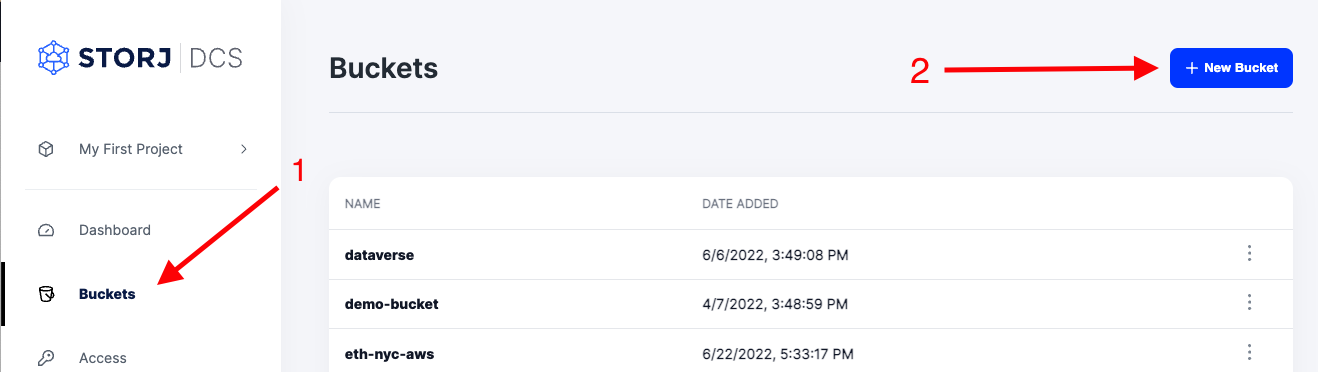
1. Navigate to “Buckets” on the left side menu.
2. Click “New Bucket” on the top right.
3. Assign the bucket an easily identifiable name, such as "my-bucket".
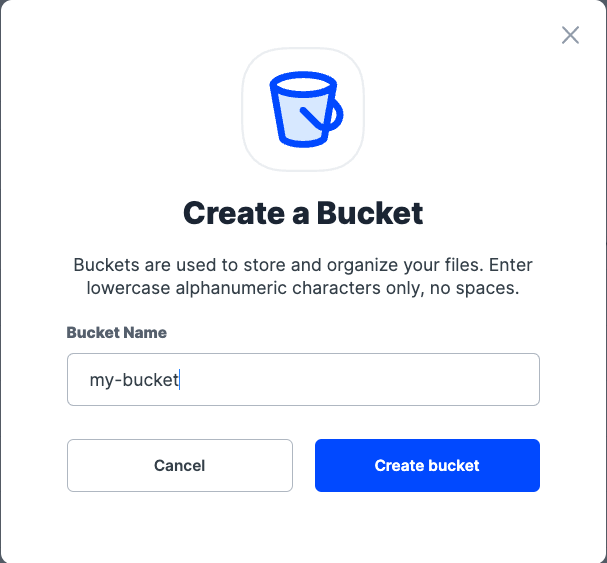
4. Click Create bucket
Generate S3 credentials
Storj has an Amazon S3 compatible API and you'll need generate S3 credentials to use it. S3 credentials consist of an access key, secret key, and endpoint.
Create S3 credentials in the Storj web console:
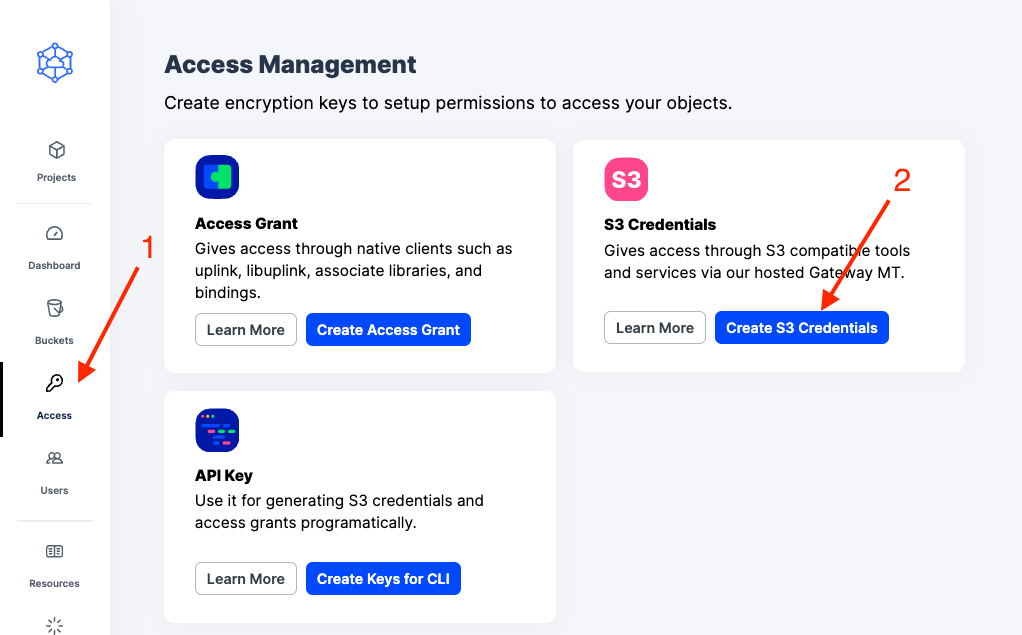
1. Navigate to Access on the left side menu.
2. Click Create S3 Credentials under the S3 Credentials block.
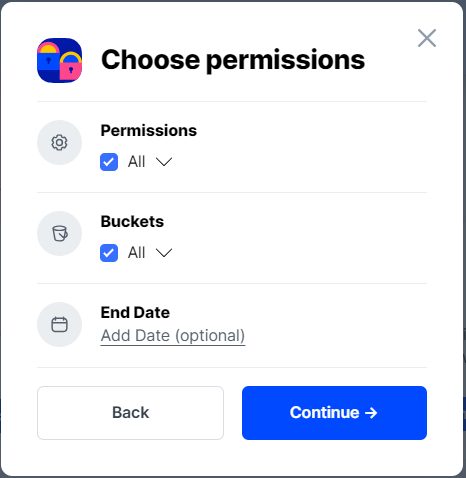
3. When the Create Access screen comes up, set specifications according to the following guidelines:
Type: S3 Credentials
Name: The name of the credentials (e.g. my-access)
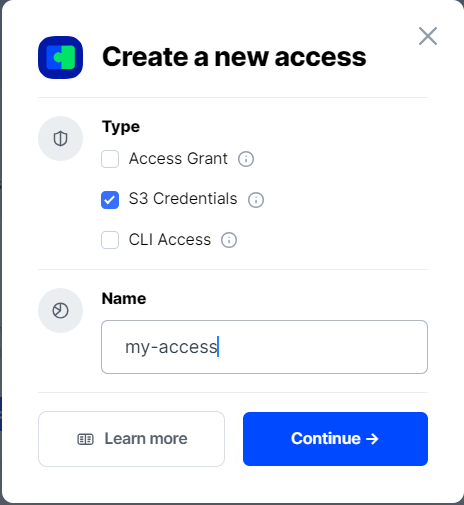
4. Click Continue to provide permissions
Permissions: All
Buckets: Feel free to specify the bucket you created above (e.g. my-bucket), or leave as “All”
End date: provide an expiration date for these credentials (optional)
5. Click Continue to provide Access encryption Information
Use the current passphrase: this is default option
Advanced: you may provide a different encryption phrase either your own or generate a new one.
Enter a new passphrase: use this option, if you would like to provide your own new encryption phrase
Generate 12-word passphrase: use this option, if you would like to generate a new encryption phrase
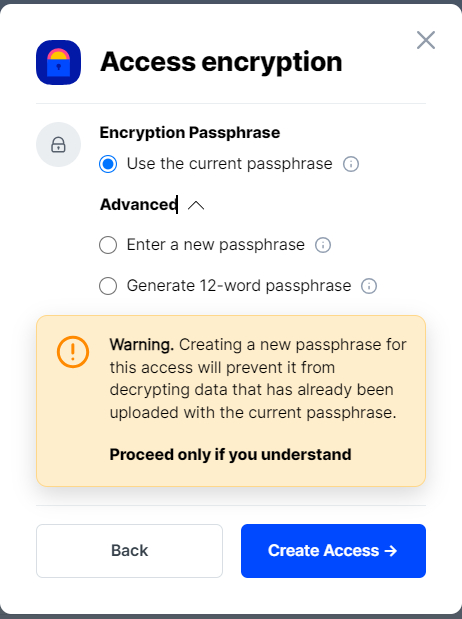
In order to see the data uploaded to your bucket in the web console, you must unlock the bucket with the same encryption passphrase as the credentials.
6. Click Create Access to finish creation of your S3 credentials
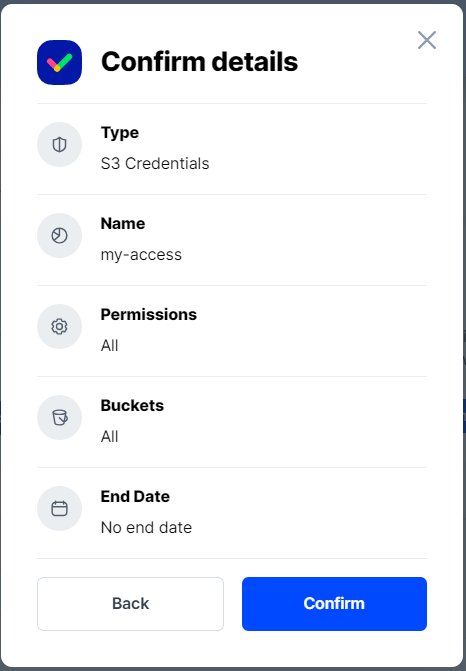
7. Click Confirm the Confirm details pop-up message
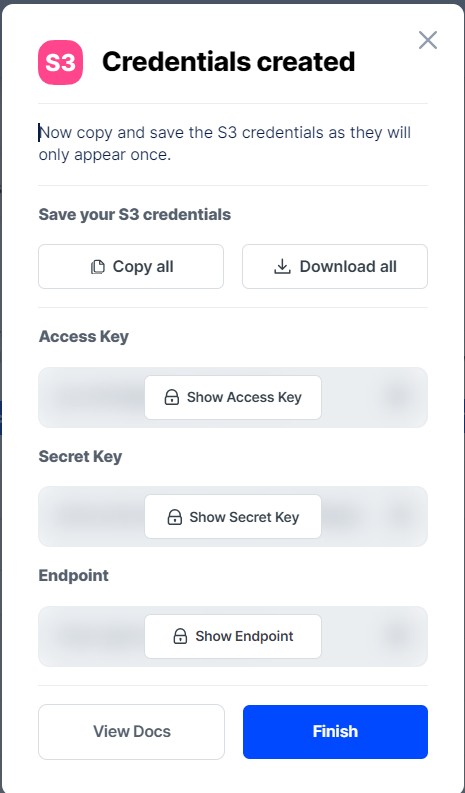
8. Your S3 credentials are created. Write them down and store them, or click the Download all button. You will need these credentials for the following steps.
Integrating Iconik with Storj
To complete the integration, you will need the S3 credentials created in the previous steps and access to an Iconik account.
Iconik Access
To sign in to your Iconik account, visit https://iconik.io/ and click Sign In. This takes you to https://app.iconik.io/ from where you can enter your credentials.
If you do not have an Iconik account, you must request a trial by clicking Request Trial on the home page or filling out the contact form at https://www.iconik.io/trial.

Add New Storage in Iconik
1. From the Iconik app landing page, click on ADMIN in the top navigation bar.
2. From the left-hand menu, select the brown Storages icon, which appears as a file storage unit. This will take you to the Storages section, where all connected storages are listed.
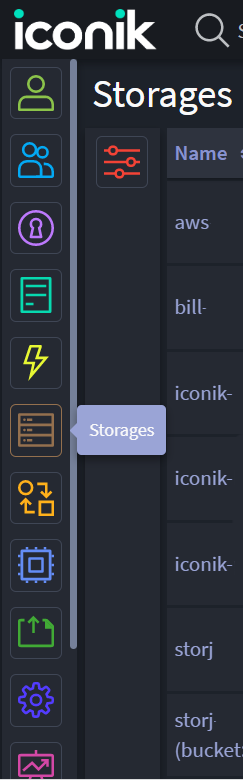
3. From the Storages section, click + NEW STORAGE in the upper right corner. This brings up a pop-up screen.

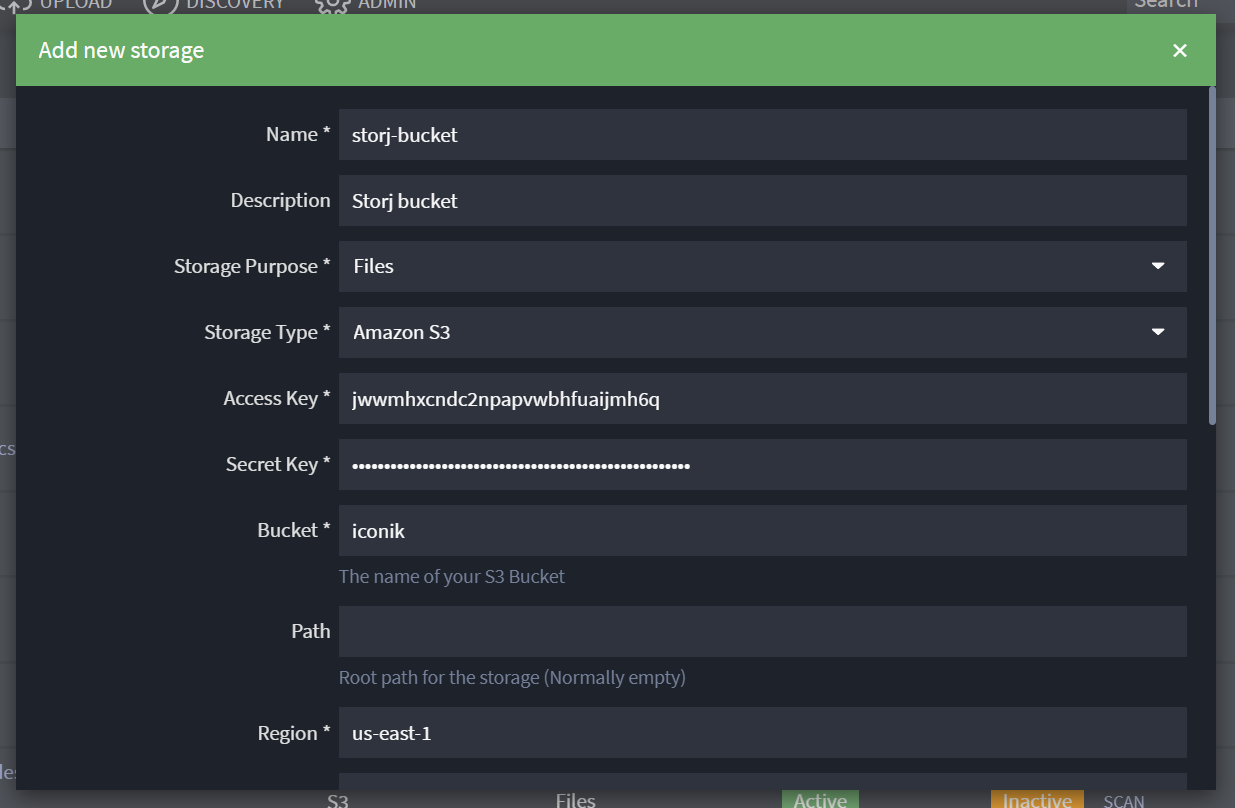
4. In the pop-up screen, you will enter all of the relevant information about your storage, including the S3 credentials you have saved from the previous section of this tutorial. Fill out the fields as directed below:
Name: What you will call this storage in the Iconik app. For example, "storj-bucket".
Description: An optional brief description of your storage space.
Storage Purpose: Select the purpose of this storage space from the drop-down. For instance, if it is primarily an archive destination, select Archive. If it will contain working files, select Files.
Storage Type: Select Amazon S3. This is the option for all S3-compatible cloud storage.
Access Key: Enter the access key from the S3 credentials you generated in Storj.
Secret Key: Enter the secret key from the S3 credentials you generated in Storj.
Bucket: Enter the name of the bucket you want Iconik to access in Storj. In this case, the bucket is the "iconik" bucket you created earlier.
Path: The root path of your cloud storage. Normally left empty.
Region: Your region. For example, "us-east-1".
Endpoint: Iconik sets the default to the AWS endpoint, but any S3 compatible storage will work. Put the Storj corresponding http(s)-endpoint here, https://gateway.storjshare.io
Use Acceleration: This feature only applies to AWS storage and should be ignored.
Enable any of the following file permissions to your files if desired:
Add unique ID to the filenames
Read
Write
Delete
Enable Scan
Scan Directories: add directories to scan in this field.
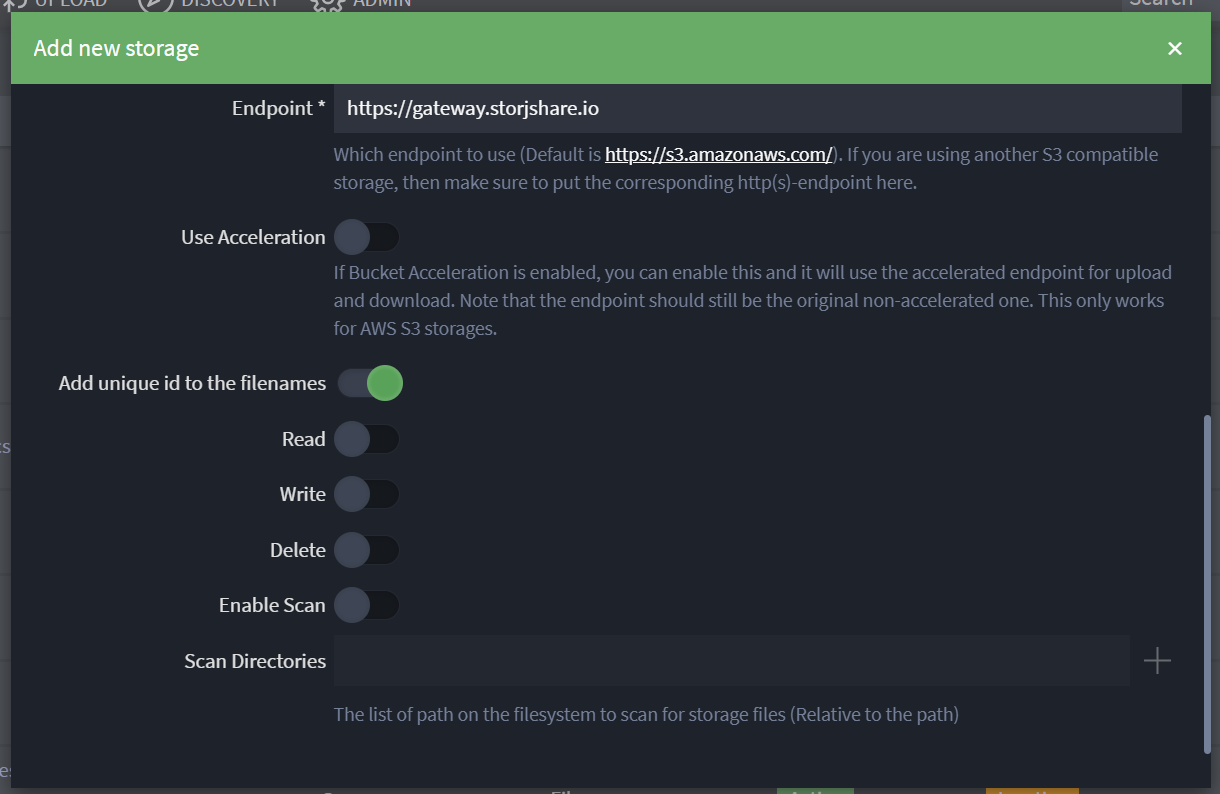
5. Click OK at the bottom of the pop-up screen.

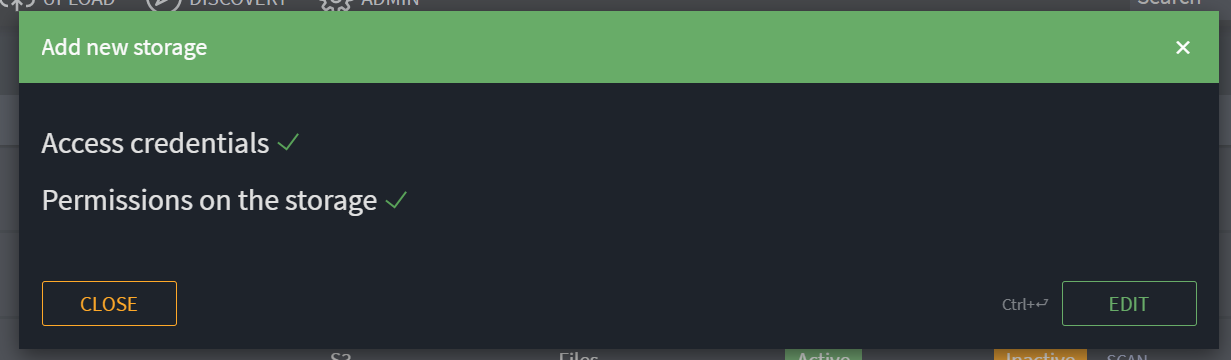
Success!
Confirmation of Success
A pop-up window confirms that your storage was created successfully with a green checkmark next to "Access credentials" and "Permissions on the storage".
Click Close to exit, or Edit to make changes to your storage credentials.
Editing Your Storage
Clicking Edit takes you to the general settings page for the storage. From there, you can make any changes to the credentials and permissions you initially set.
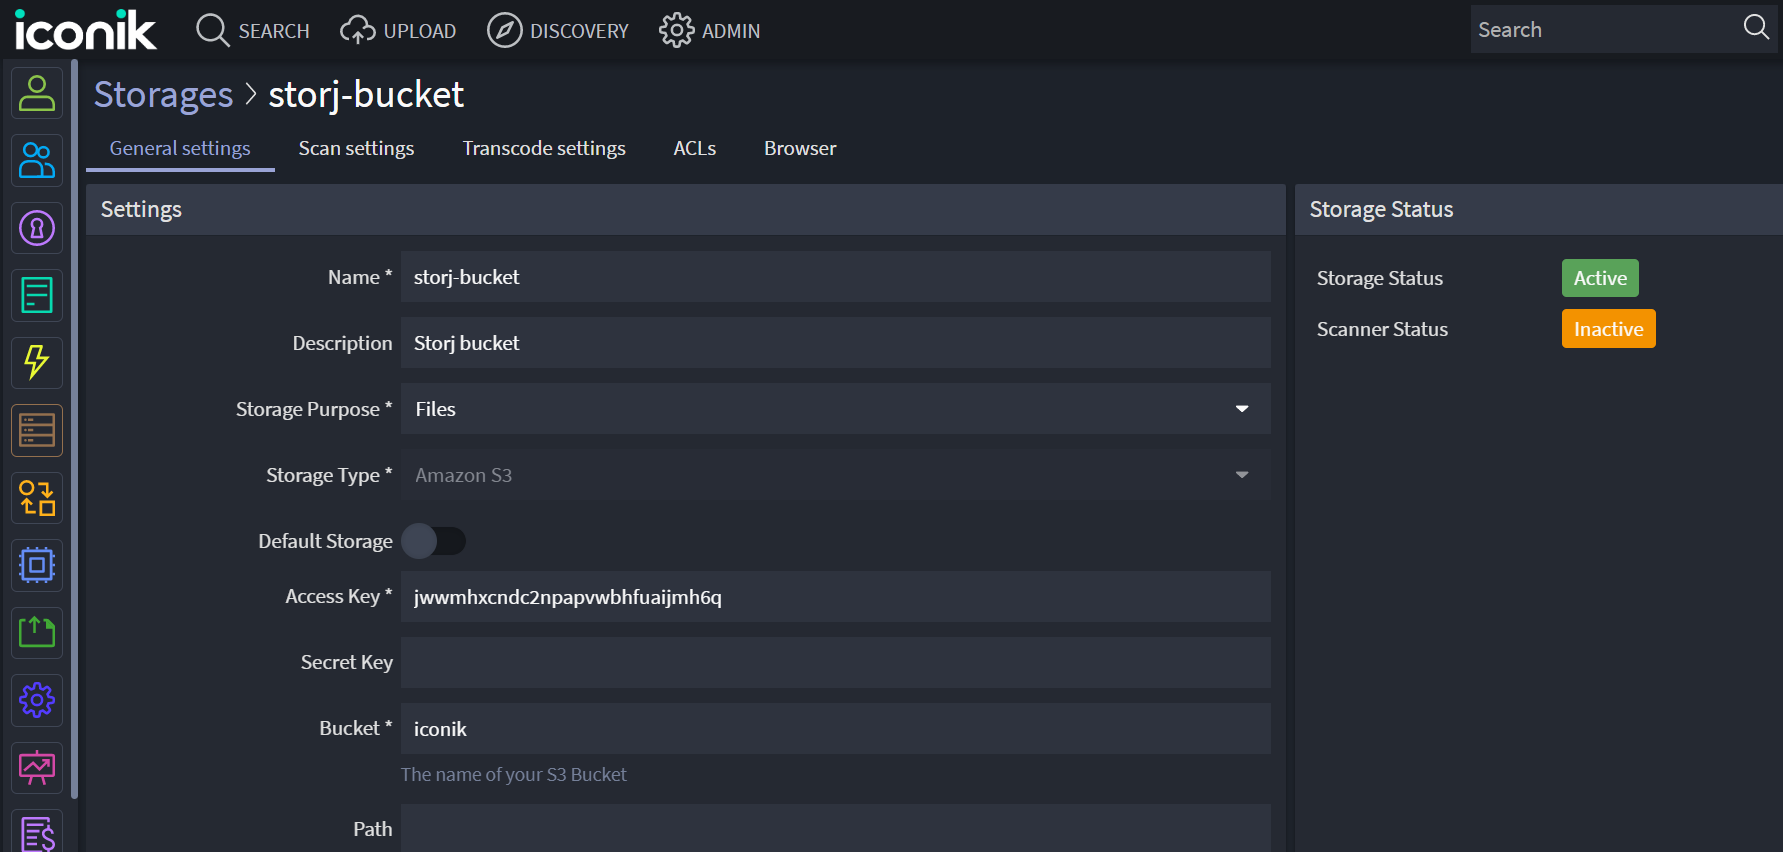
Returning to the Storages section, you will see the new storage listed. Clicking on the storage row also takes you to the general settings page of that storage.

Testing your Storj storage in Iconik
All storage files are accessible from the main page of the Iconik app. When you add files to your iconik bucket in Storj, they become available in Iconik's web app.