Comet Backup Integration Guide
Introduction
Comet is a flexible backup platform that gives users total control over their backup environment and storage destinations. Comet provides solutions to protect and restore partitions, databases, servers, files, and folders. Whether users are looking for cloud backup, computer backup, or data backup, Comet can address those needs.
Visit https://cometbackup.com/ for more information.
Advantages of Storj with Comet Backup
Using Storj with Comet Backup provides resilient cloud object storage with blazing performance and zero-trust security. This integration ensures:
High recovery speed for backup data: Enjoy CDN-like performance at cold storage prices for instant recovery of backup data.
Durability: Data is reliably preserved long-term.
Security: Backup storage is ransomware resistant with end-to-end encryption.
Software Requirements
Comet integrates with any S3-compatible cloud storage platform, including Storj. Storj functionality is available on Comet Server version 22.9.0 and above.
To integrate Comet with Storj, you will need:
A Storj account
A Storj bucket for Comet
A working instance of Comet Server
Installation
You will need to install an instance of Comet Server prior to integration. If you do not currently have one, please refer to Comet’s getting started guide. Comet supports Windows, MacOS and Linux backup.
You can also download a free trial of Comet here.
Integration
This integration uses an API access key for Storj. To complete the integration, you will need to set up a Storj account, create a Storj bucket for Comet, and generate an API key. Then, you will pass these credentials to your instance of the Comet Server.
The sections below provide a detailed walkthrough of the integration steps.
Setting up Storj
Create a Storj Account
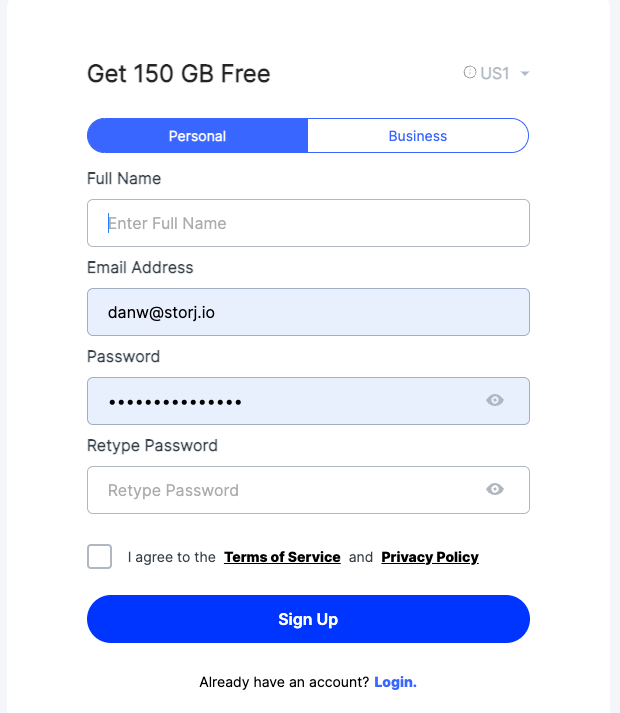
To begin setting up Comet with Storj, first create a Storj account.
Navigate to https://storj.io/signup?partner=comet to sign up or log in to an existing Storj account. If signing up, enter your full name, email address, and password, as shown below:
Create a Storj Bucket
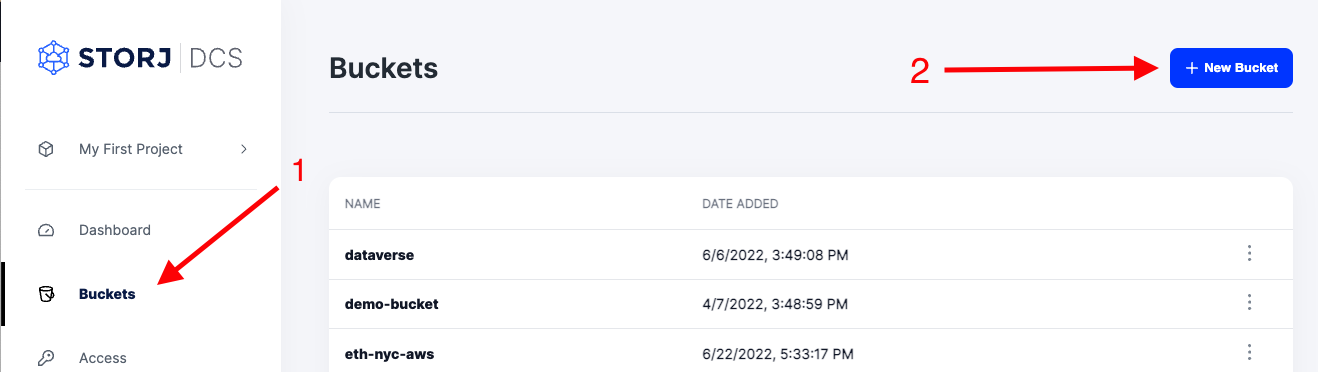
Once you have your Storj account, create a Storj bucket for Comet following the steps below. This bucket is where Comet will create Storage Vaults.
1. Navigate to “Buckets” on the left side menu.
2. Click “New Bucket” on the top right.
3. Name the bucket something identifiable such as “comet-backups”.
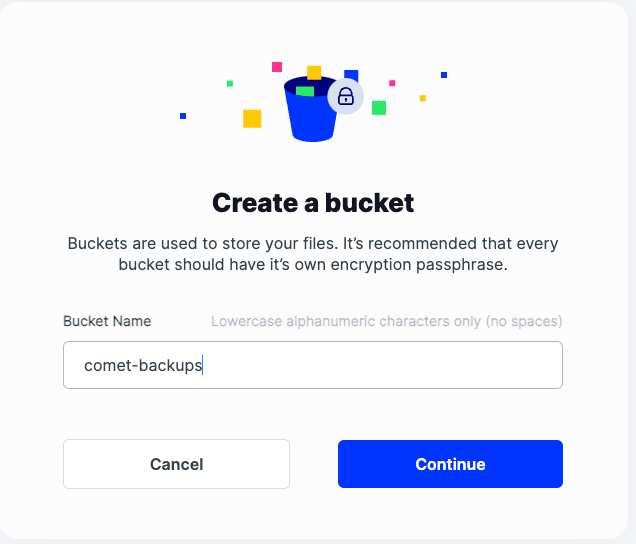
4. Select “Continue”.
5. Generate a passphrase or enter your own.
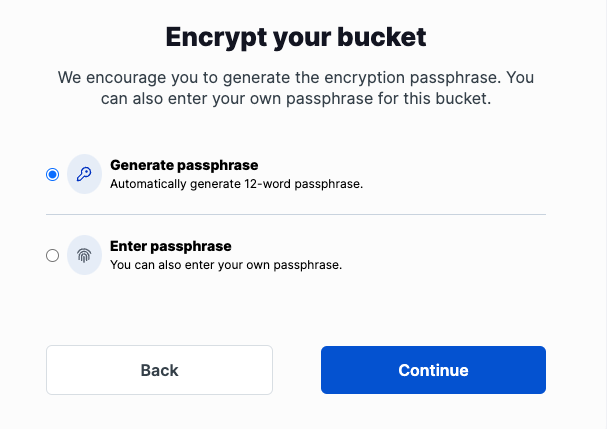
6. Select “Continue”.
7. Record the passphrase somewhere safe.
Remember your passphrase as you will need it for future access of your data. Storj is unable to recover your passphrase for you.
Generate a Storj Access Key
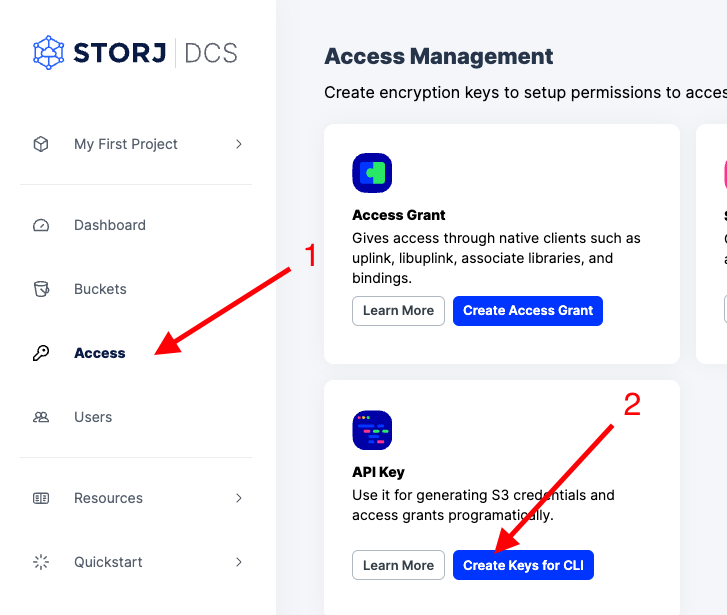
Users will need to configure a Storj access key for Comet to be able to create Storage Vaults. Create an API access key in the Storj web console:
Navigate to “Access” on the left side menu
Click “Create Keys for CLI” under the API key block
3. Set specifications according to the following example:
Type: API Access
Name: The name of the access key (e.g. Comet)
Permissions: All
Buckets: Feel free to specify the bucket you created above (e.g. comet-backups), or leave as “All”

4. Click “Create Keys” and record the API key somewhere safe
Integrating Comet with Storj
To complete the integration, you will need the credentials (bucket name and passphrase) for the Storj bucket and the Storj API access key you created above.
Configuring a Storj Storage Template
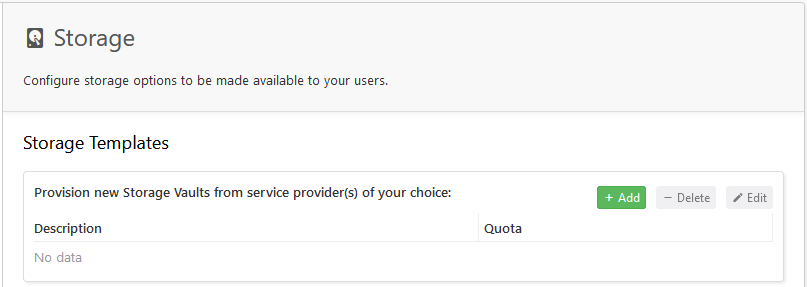
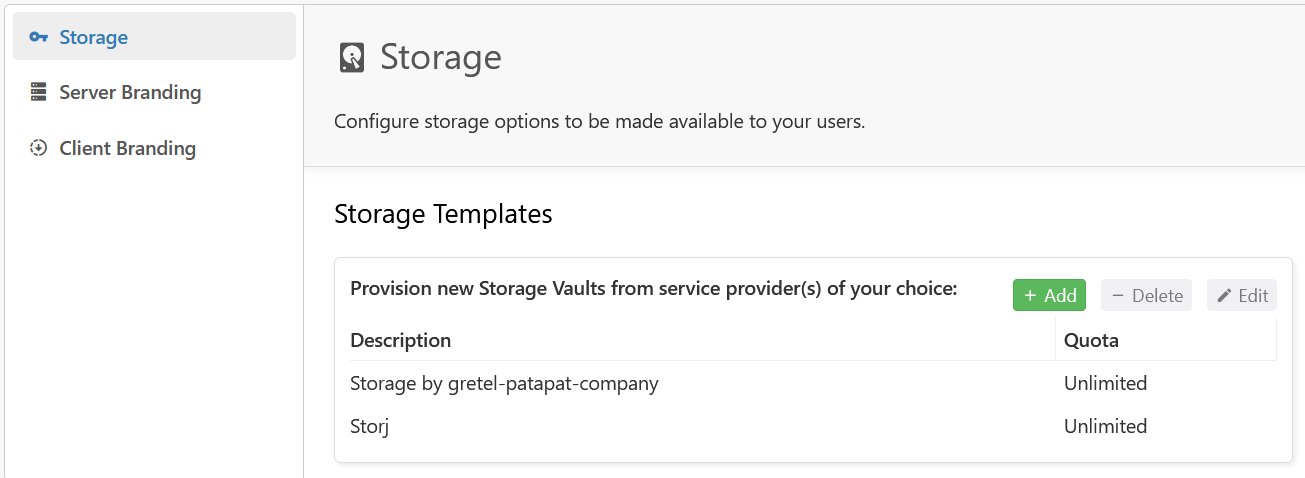
1. Navigate to your Comet Server settings and find the Storage Templates section
For Comet-Hosted servers, navitage to: Settings -> Storage -> Storage Templates
For Self-Hosted servers, navigate to: Settings -> Authentication -> Storage Templates
2. Click the green “Add” button to add a new Storage Template
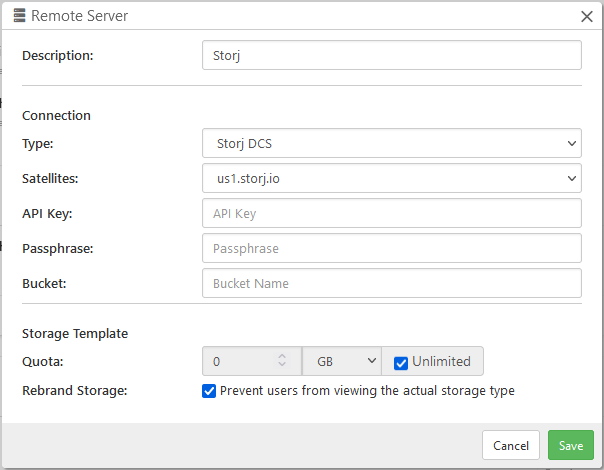
3. Change the “Type” to Storj and then fill in the fields as described below:
Description: What you will call the storage on the Comet Server
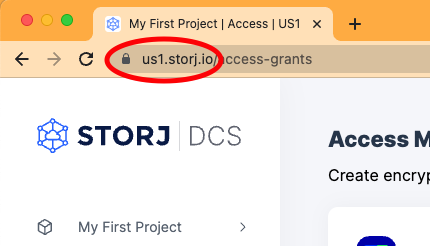
Satellites: The location of the Storj satellite server. The satellite you are using is visible in the url of the Storj web console. For instance, if the URL is us1.storj.io/access-grants, the satellite is "us1.storj.io".
API Key: The API key created above (see the Generate a Storj Access Key section.)
Passphrase: The passphrase you created for your Storj bucket (see step 5 in the Create a Storj Bucket section).
Bucket: The name of the Storj bucket you created above (see step 3 in the Create a Storj Bucket section).
4. Once complete, Storj should appear as an option in the Storage Templates section in your Comet Server.
Success!
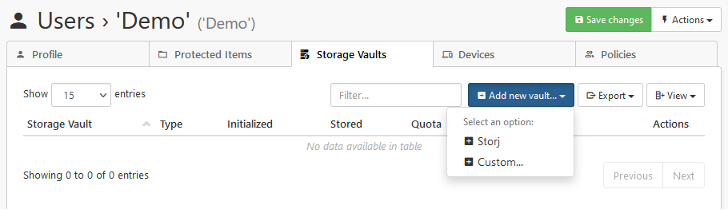
Once you have completed the integration, you will be able to request a new Storj Storage Vault for a user in Comet by clicking the "Add new vault" button and selecting Storj from the drop-down.
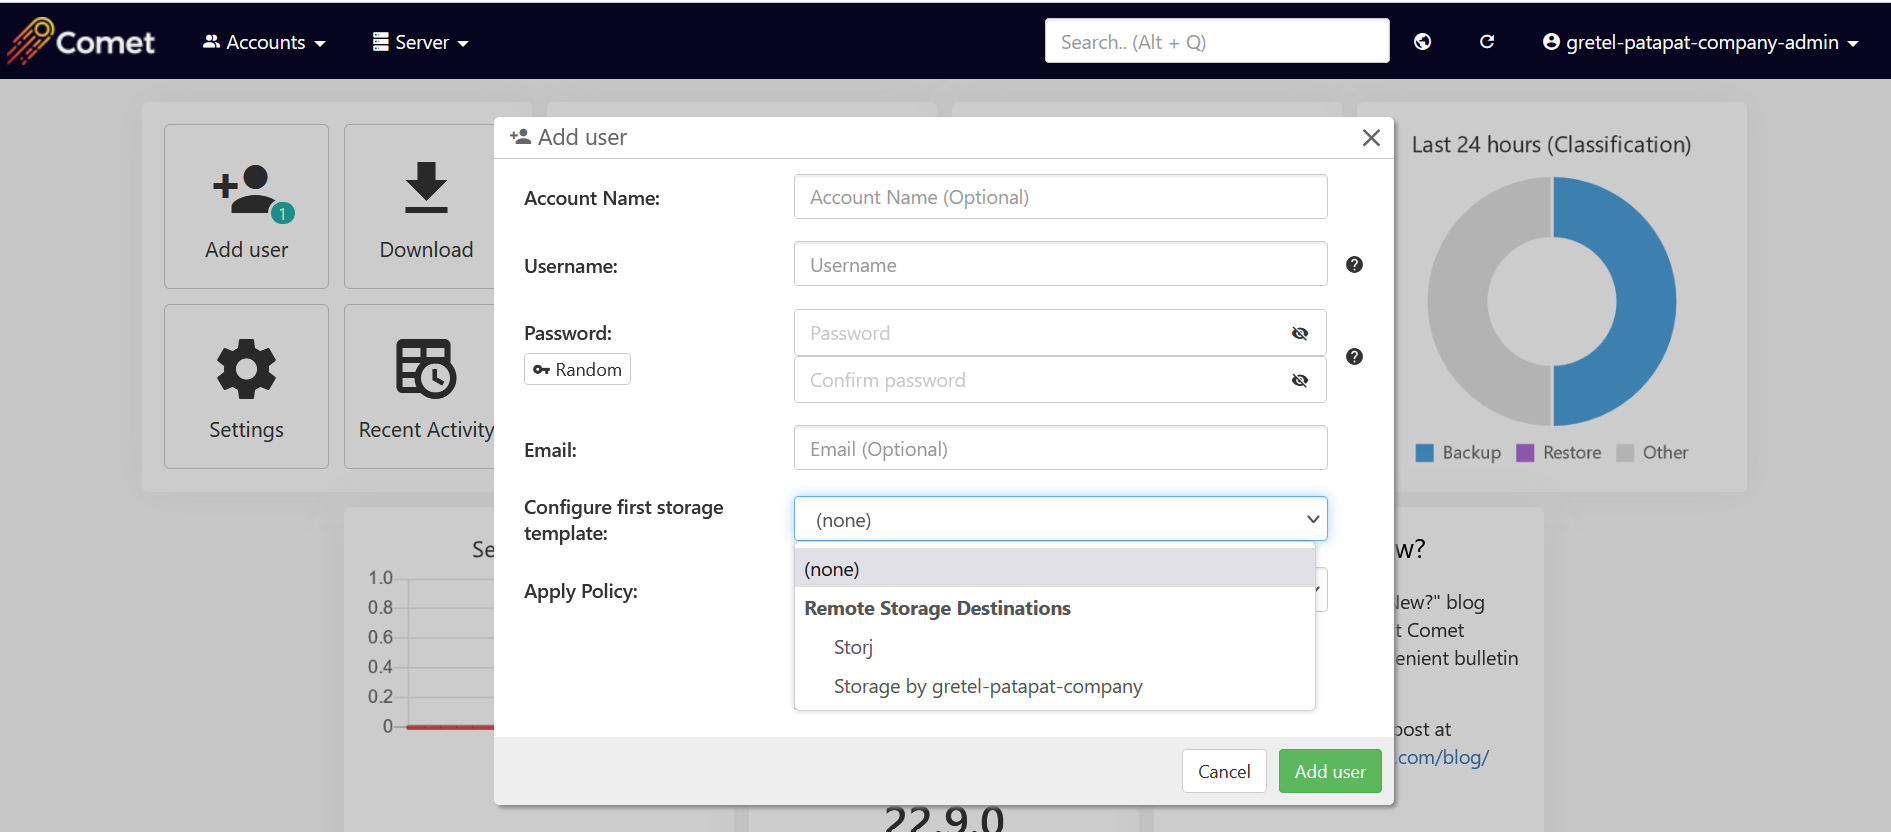
You can also request a Storj Storage Vault when adding new users in Comet. Storj will appear as a Remote Storage Destination option under the "Configure first storage template" field when adding a new user.